🍸 Elevate your space with style and function — the ultimate flip-top bar table!
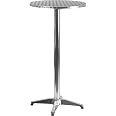
This 23.25" round bar height table features a heavy-duty aluminum frame and a stainless steel flip-up tabletop, designed for both indoor and outdoor use. Seating up to 2 adults, it offers a sleek, space-saving solution with a 130-pound weight capacity, perfect for hospitality venues or stylish home patios.
| Color | Aluminum |
| Shape | Round |
| Table Design | Dining Table |
| Style Name | Flip Top |
| Finish Types | Silver |
| Furniture Finish | Stainless Steel |
| Leg Style | Arch |
| Top Color | Black |
| Handle Finish Type | Stainless Steel |
| Base Color | Black |
| Handle Color | Black |
| Item Dimensions D x W x H | 23.25"D x 23.25"W x 45"H |
| Item Weight | 19 Pounds |
| Size | 23.25" Round |
| Tabletop Thickness | 0.88 Inches |
| Item Width | 23.25 Inches |
| Base To Top Distance | 45 Inches |
| Maximum Weight Recommendation | 130 Pounds |
| Recommended Uses For Product | Patio Bar Table |
| Indoor Outdoor Usage | Outdoor |
| Specific Uses For Product | Residential Use; Non Residential Use |
| Warranty Type | Limited |
| Frame Material Type | Aluminum |
| Top Material Type | Metal |
| Product Care Instructions | SW-Solvent and water based cleaner such as foam |
| Base | Aluminum |
| Is Stain Resistant | No |
| Material Type | Metal |
| Handle Material | Aluminum |
| Seating Capacity | 2 |
| Base Type | Arch |
| Is Foldable | Yes |
| Number of Items | 1 |
| Frame Joint Type | Welded |
| Unextended Seating Capacity | 2 |
| Is Customizable? | No |
| Is Electric | No |
B**L
This is a sturdy table with easy to adjust legs to make it ...
This is a sturdy table with easy to adjust legs to make it steady on uneven surfaces. It's taller than many might want at 45 inches per my measurement. I can see why people who are used to step by step instructions with labeled parts would complain about the assembly but it's actually quite easy to assemble if you read through the reviews and follow a few simple suggestions. Since there are so many complaints about the instructions, I've been meaning to write this review for some time but it's been a while so I may not be perfect in the below suggestions.1. The nut and bolt which hold the base weight to the base for shipping purposes is just that - for shipping purposes. My memory is that it has no part in the assembly so add it to your collection or throw it away after you've finished assembly. Just make sure you've finished assembly before discarding it since the parts could have changed so I assembled mine.2. Make sure you have a good 17mm (that's my memory) wrench and, if also available, socket wrench, to finish off tightening as the final step. That will give you a very sturdy table.3. It has very few parts, all of which can be identified by the photos, and the diagrams show where each part (and how many) go. It just takes a little study but not that much since there are so few parts.4. The best suggestion I read was to build upside down. Securely attach the the folding bracket to the table top, then attach the support rod to the bracket, then slide on the support tubes with the middle connector, then the base, then the base weight and then attach it all together with a washer, split washer and two nuts. Note that there is a notch in the bottom tube that fits into a slot in the base that keeps it from rotating. Securely attaching the folding bracket to the table top and then the two nuts to the bottom weight gives a very sturdy table. This is a really good place to use a socket wrench to make it quite tight.5. Note that the middle support rods are not totally screwed together or into the folding bracket or there won't be enough threads left to attach the bottom weight. I didn't realize that until the end of my first time through and had to remove the bottom legs and middle tubes to lengthen the support rods. That took all of an extra couple of minutes.As noted, the table is taller than many might want (45 inches per my measurement) and requires some pretty good engineering skills and the right tools to shorten. We ultimately decided it was too tall and, at the risk of the purchase price, I shortened it five inches, which made it a perfect height for us. I would not recommend doing that unless you're really good at that sort of thing and have the right tools. Even with that, I got lucky and it worked out. The process included (i) removing half of the folding bracket to use as a large washer (the support tubes don't fit flush against the table top so I used a portion of the folding bracket for that purpose), (ii) drilling out the folding bracket so the support rod could screw directly to the table top and (iii) shortening both the support rod and support tubes. Again, I don't recommend trying this. If a 45 inch tall table is too tall for you, I suggest not buying this table. If that height works for you, then this is a great table for the price.
K**E
Beware assembly! There are issues.
Very sturdy in the end, and looks nice and solid, with fairly substantial construction. We are not talking highquality here - just solid enough and good-looking enough to be out for art gallery opening receptions: so that's pretty good I would say.But every buyer should take note about a few things in assembly. I was fortunate to have one reviewer advise to place the tabletop facing the floor, and build it up (towards the base and feet) from there. If you are moderately confident you can put together a puzzle, you will be in good shape. Because the directions are just a fairly inaccurate "exploded view".Biggest thing not shown at all in the drawing is key. I had to disassemble all four of our tables when I discovered on the last one a little notch on one end of one section of the two tubes which butt together with a ring. You need to make sure the notch lines up with a bump that is cast in either the top or bottom plates - I don't have the tables right here so I can't tell you which end for sure - just look carefully for it, or your table will be crooked and wobbly no matter how tightly you cinch it down. Line it up and it solid.The same person who gave the helpful idea of working the table upside down also mentioned to "keep the bolt inside the locking assembly". I think that bolt actually gets thrown away; it is just a way to transport the table assembly safely.Also, use a real wrench or socket: the supplied "wrench" barely allows for you to get the torque needed to give you a stable table. And will give you scraped knuckles in the process. I am getting the skin back after a week, myself.The other point to be made is that you will have several washers left over. Just make sure the lock-washer is always nearest the nut, then the flat washer, then the part it is attaching to.The last bit of advice was something I mostly lucked out on, but there is a delicate balance between how far to put the rod in either end. My advice is to check to make sure it comes exactly to the end of the nut on the inside of the locking mechanism. If it goes a couple threads beyond that, it will not close properly. Too short and other problems advance.Definitely though, this seemed like a very good table for the price! I guess the low price did not allow them to hire a good instruction writer.
Trustpilot
2 months ago
1 month ago