🛠️ Store smart, live stylish—your backyard’s best-kept secret!
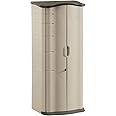
The Rubbermaid Small Horizontal Resin Outdoor Storage Shed (4.5 x 3 ft) combines durable, UV-resistant double-wall resin construction with a water-resistant lid and impact-resistant floor. Designed for versatile outdoor storage, it fits seamlessly into any patio or backyard with its neutral beige/brown tones and doubles as extra seating or a side table. Lock-ready for added security, this maintenance-free shed protects your garden tools, cushions, pool chemicals, and more.
| Door Height | 32 Inches |
| Item Dimensions D x W x H | 28"D x 55"W x 36"H |
| Item Weight | 49.7 Pounds |
| Is Assembly Required | No |
| Style | Small Horizontal Shed |
| Color | Olive/Sandstone |
| Top Material Type | Resin |
| Frame Material | Resin |
| Base Material | Resin |
| Material Type | Resin, Plastic |
| Ultraviolet Light Protection | uv |
| Water Resistance Level | Water Resistant |
G**Y
Good value; assembly not too bad but instructions poor
I bought this item a few months ago and just got around to putting it together. After laying out the pieces and reading the printed instructions, I searched for a video showing the assembly process. No joy! So I read a few reviews, learned of some potential problems, re-read the instructions, donned my work gloves, and picked up my rubber mallet.Before you start, be aware that you really need to do this on a hard surface. If your shed's ultimate location is on your lawn or other soft ground, DO NOT ASSEMBLE IT THERE. Yes, moving it once it's put together is a chore, but trust me on this, it's necessary. Also, you'll need plenty of room to make assembly easier. Finally, I put this together by myself, but for a lot of buyers it should be a two person job.I ran into the first problem right away. The instructions say to snap the left and right side/back pieces together, and it sounds easy. Don't try to do this with the pieces upright. Lay them flat and bend each side part upright until it snaps in position. Butt the two pieces together so the four connections line up. Forget the mallet. Step onto the pieces and then stomp on each of the connections until you hear each one snap into place. Once that's done, lift it back upright.The next step is to slide the floor piece into place at the bottom of the sides. If you look, you'll see two places on each side where the floor can be set into grooves on the sides. Line those up and then, standing in front of the partial shed, grab the front of each side and pull them so the grooves and tabs are in position to go together. Kick the front edge of the floor piece until the tabs are in the grooves. You won't get them to snap into place yet. Tilt the whole thing toward its front so that the back is topmost. Grab your mallet and bang on the four places where the floor meets the back until you hear and see them snap together. Once that's done, stand it back upright.Time for the doors. Both are added the same way and it doesn't matter which you do first right now but I'll write this up starting with the left one. There's a pivot pin at the top of the door that fits easily into a hole in the side piece. There's another pivot pin at the bottom that's not so easy. With the top pin in place, push the door into the more-or-less closed position while lifting up on the right edge so the bottom door pin rides up onto the floor. Push the door so the bottom pin is heading toward its floor hole and it will jam itself into position so you can let go and bend down to see where the pin is relative to the hole. Bang on the door with your mallet while watching your progress and you should be able to get the bottom pin in correctly. It isn't difficult but you do need to watch what you're doing. Then do the same thing for the other door.The last piece is the top, and it will be easier with two people. Hold the top up over the rest of the shed so the metal prop-up rod dangles over the slot in the top front of the right side piece. You need to rotate the top counter clockwise while holding it flat so that the bend at the bottom of the prop can go into the slot. Once it's in, rotate the top back into alignment, then lower it to line up the hinge points at the back. Bang on them with the mallet until they snap into place.That's it, you're finished. Not counting the unproductive time I spent trying things that ended up not working, the whole assembly took me maybe 20 minutes, and would have taken less time if I'd had a helper.I like the shed. It sure feels sturdy now that it's assembled, and it appears to be reasonably weather resistant for the way it's built. My only real gripe is poor, or at best inadequate, instructions. Rubbermaid would be doing themselves and their customers a favor by putting together some simple YouTube assembly videos for this product line. I'd volunteer but I'm old, fat, and homely.
D**K
Great Quality
Great product with. Rey clear instructions for assembly.All part clearly marked. Delivery truck tryed to deliver tv before I caught them
B**.
Great storage solution for small garden tools and yard equipment.
This large horizontal Rubbermaid Storage Shed is a high quality storage solution that may not require a town permit and is great for trash bins or small yard tools and equipment. My unit arrived in secure packaging and complete parts in perfect condition, although a couple pieces of injection molding plastic tabs remained after manufacture. After removing those tabs, assembly proceeded per the instructions. Having a second person available to assist with the parts helped tremendously. It is also important to have a firm and level foundation on which to assemble and place the shed. I constructed a shelf per the enclosed user instructions and it fit perfectly.
J**R
Great product & worth every penny, but...
I have to say that I was worried on ordering this after reading other reviews, but I think there are two issues that need to be address. One, it arrived in a very large, cumbersome flat box and two it isn't the easiest to put together.Amazon left the box right up against my house by the garage. So the delivery was done with care & the box was in good order. I had to carry each pcs. by hand from there into the backyard. It is very sturdy, heavy & waterproof. No complaints there.However, when you put it together there are no nuts, blots or screw. It instead, physically pops together and here is where the problems begin. One needs a friend and a very strong mallet. Because in order for it to be assembled, especially the floor, you need some seriously good muscles. Which I completely lacked.I gave up and got my neighbor's muscles. I held, while he whacked away with my heavy mallet, pounding it into submission. His muscle strength made all the difference in how it fit together. You may not have such an agreeable neighbor, so just know that going in.I love it now that he properly fit it together. It holds all the cushions & pillows to my outdoor furniture. I live in the North Carolina were we get a lot of biblical weather. It has already done well with one major storm. The whole thing was dry as a bone. So great product... if you have strength to put it together !
T**D
Nice SMALL storage shed.
Listed as: Rubbermaid Plastic Vertical Outdoor Storage Shed, (FG375301OLVSS)While this is described as the Rubbermaid VERTICAL shed is is actually the Split Lid Horizontal shed #3753. The photo and dimensions are correct.I was very surprised when I saw this was coming FedEx. When the driver arrived he was very happy I was home to help him deal with the large cumbersome box. The box had started to come apart along the way and had been taped back together. Nothing was missing or damaged just larger and more cumbersome than he was use to. The driver used a hand truck to wheel it through the yard gate and out of sight till I could deal with it.The shed went together easily, the only problem was getting the tabs on the floor section to lock in the slots of the back section. Rolling the shed over, back up, and hitting the slot area with a hammer got the tabs to lock. The small size makes it easy for one person to maneuver the shed during assembly. I put it together on the patio and then slid it onto the pad that was in place for the vertical Rubbermaid shed being replaced. (The vertical shed never did go together properly and had been a problem for years.)I have had this shed's larger cousin for around 20 years and it has held up well. This shed is in the same general area so the two match up fairly well. This shed does not seem quite as well built but we will see how it holds up over time.I am using the Split Lid shed to store the BBQ cover and patio table cover in the summer and will probably store cushions and folding chairs over the winter.I have uploaded 2 photos to help clarify what this product is and the relative size of the larger Rubbermaid shed.
Trustpilot
1 day ago
5 days ago